

An XML sitemap is a file that shows search engines the pages you want them to find. It does not make Google crawl, index, or rank your pages. Instead, it helps Google find them faster, especially on large SaaS websites or sites that change often.
This guide shows you how to create and submit an XML sitemap from scratch. And if you already have one, note that you’ll also learn how to check that it works properly.
| Before we get into this guide, you can do this first: → Check whether you already have a sitemap. To do this, you can visit yoursite.com/sitemap.xml right now. → If it loads, you can skip to the 5-Minute Health Check section below before building anything new. → But if it loads 404s, continue to the setup steps. |

What an XML Sitemap Actually Does
An XML sitemap helps search engines find your pages faster. Instead of relying only on links, search engines can read your sitemap to discover important pages on your site.
In practice, a sitemap is most helpful when:
- Your site has hundreds or thousands of pages
- You publish or update content often, like a SaaS blog or docs library
- Some pages are not well linked internally
- Your site is new and has few external links pointing to it
Another interesting thing about an XML sitemap is that it does not guarantee Google will index your pages. And that’s because Google still decides which pages to index based on their quality and other ranking signals.
That’s why if your sitemap looks good but Google still does not index your pages, you need to check for other indexation issues.
What a Sitemap Entry Looks Like
A standard XML sitemap entry uses simple code with tags like <loc>, <lastmod>, and <changefreq>. It tells search engines which pages exist and when you last updated them. As you can see in the block below:
<url>
  <loc>https://example.com/pricing/</loc>
  <lastmod>2026-06-14</lastmod>
</url>
Skip the changefreq and priority tags. Google has said it mostly ignores them, so they just add file size.
How to Build Your Sitemap
Building a sitemap is not as hard as many teams think. To do this, the first step is to choose a way to create it. Perhaps you may decide to use a CMS plugin or an online sitemap generator to do that.
That said, the next step is to ensure it uses the correct format, such as XML or HTML. And finally, you can then submit the sitemap link to search engines so they can crawl and index your pages in Google Search Console.
But here’s the catch: you need to choose the method that matches your website setup to build your sitemap. Below are the most common paths and what you need to do for each one:
Path A: You Use WordPress, Webflow, Squarespace, or Another CMS
If you are using any of these platforms, the first thing is to check if your sitemap already exists. Go to: yoursite.com/sitemap.xml
If you use WordPress, make sure Yoast SEO or Rank Math is active. Both plugins automatically create and update your sitemap.
And if you use Webflow, Squarespace, or a similar website builder, the platform creates your sitemap for you.
The main thing is to open the sitemap URL and make sure it loads. No other setup is needed.
Path B: You Use a Custom Website or SaaS Marketing Stack
This method works best for custom-built websites and SaaS platforms. It entails creating a script that collects your live, canonical URLs from your CMS or database, either daily or whenever you publish a page.
Next, have the script generate a valid XML sitemap like the example above.
Then, place the sitemap at: yoursite.com/sitemap.xml
Finally, set the script to run automatically. This way, your sitemap updates itself whenever you add, remove, or change a page. You won’t need to edit it yourself.
Path C: You Need a Quick, Temporary Sitemap
This is a method you can use if you need a sitemap quickly.
But the first thing to do is to crawl your website with Screaming Frog or a similar crawler.
And then, export the XML sitemap it creates. After which, you can upload the sitemap to your site’s root folder.
Now, you can only use this as a short-term solution. And that’s because it won’t update when your website changes. If you start with this method, it’s paramount for you to switch to Path A or Path B as soon as you can.
Choosing the Right Pages for Your Sitemap
Not every page belongs in your sitemap. The point is that you should only include the pages you want search engines to find, crawl, and show in search results. Below are pages that you should include and those you should exclude.
Example XML Sitemap: What to Include and What to Leave Out.
Include These
☐ Only canonical URLs (the version you want Google to rank)
☐ Pages that return a 200 status code
☐ Pages that are not blocked by robots.txt
☐ Pages you want to show in search results
Leave These Out
☐ Redirected pages (301 or 302)
☐ Pages with a noindex tag
☐ Pages blocked by robots.txt
☐ Duplicate pages or URLs with lots of parameters
☐ Login pages, search result pages, and thank-you pages
Figure 1. A sitemap should include only the main pages you want Google to crawl and rank. Leave out redirected pages, duplicate URLs, login pages, and other pages that should not appear in search results.

A sitemap should list only the pages you want search engines to crawl and rank. If it includes blocked or redirected pages, it can confuse search engines.
<< You can read our robots.txt guide to learn how to check blocked pages.>>
Splitting Sitemap if You’re Over 50,000 URLs
A sitemap can contain up to 50,000 URLs and must be smaller than 50 MB before compression. Google recommends these limits as part of its sitemap guidelines.

Most SaaS websites never reach these limits. But large blogs, documentation libraries, and online marketplaces often do.
Do this:
- Create a sitemap index file.
- Split individual sitemaps by content type: pages, blog, docs.
- Point the index file to each one, as shown below.
<sitemapindex>
  <sitemap>
    <loc>https://example.com/sitemap-pages.xml</loc>
  </sitemap>
  <sitemap>
    <loc>https://example.com/sitemap-blog.xml</loc>
  </sitemap>
</sitemapindex>
Splitting by type also makes problems easier to spot. If your blog sitemap drops from 400 URLs to 40 overnight, you will notice.
Submit Your Sitemap to Google Search Console
You can submit your created sitemap on your Google Search Console in less than 5 mins. All you need to do is to follow the simple steps below:
- Open Google Search Console and choose your website.
- Click Sitemaps in the left menu.
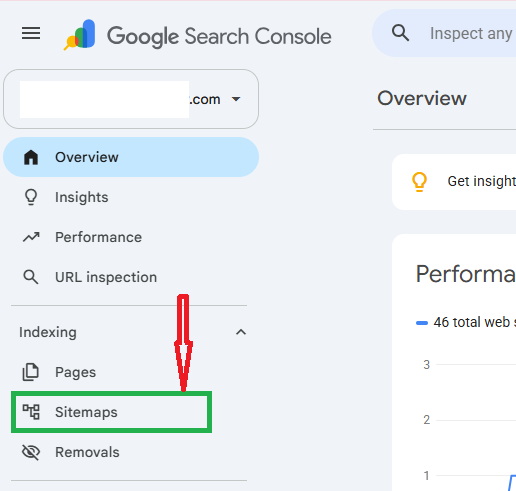
- Enter your sitemap URL, such as sitemap.xml.

- Click Submit.
Note: After you submit it, compare the number of Discovered pages with the number of Indexed pages. For example, if there is a big difference, the problem is usually low-quality pages or duplicate content—not your sitemap.

That said, you can also add your sitemap to your robots.txt file. This helps all search engines find it, even if you do not submit it through Google Search Console. See our robots.txt guide for the exact line to add.
5-Minute Sitemap Health Check
This is a check you can run on your sitemap now, whether you created it today or five years ago.
☐ Open yoursite.com/sitemap.xml. Does it open without any errors?
☐ Check 10 pages in your sitemap. Does each page load correctly?
☐ Pick 5 pages at random. Is each one the main version of the page, not a duplicate?
☐ Compare 5 sitemap pages with your robots.txt file. Does robots.txt block any of them?
☐ Open the Sitemaps report in Google Search Console. Is there a big difference between the number of Discovered pages and Indexed pages?
☐ Check the lastmod date for a recently published page. Does it match the date you last updated the page?
Now, if any check fails, it’s critical to fix that problem first. The truth is that your sitemap may still work, but every mistake makes it harder for Google to trust and use it correctly.
Common Mistakes with Sitemaps and How to Fix Them
| Mistake | Fix |
|---|---|
| Listing non-canonical URLs (HTTP + HTTPS, www + non-www) | Audit the sitemap and keep only the canonical version of each URL |
| Old URLs left in after a migration | Regenerate the sitemap immediately after any redesign or replatform |
| Blocked or noindexed pages included | Cross-check every sitemap URL against robots.txt and noindex tags |
| Sitemap only updates monthly on a site that publishes weekly | Switch to dynamic, auto-generated sitemaps |
| Search Console errors ignored | Check the Sitemaps report monthly and fix flagged URLs |
How a Sitemap Fits Into Technical SEO
A sitemap is just one part of technical SEO. It works with your robots.txt file, your internal links, and your crawl budget to help search engines find your pages.
A clean sitemap cannot fix bigger crawling or indexing problems. But a messy sitemap can make those problems worse.
To learn how all these parts work together, read our complete SaaS technical SEO guide.
Frequently Asked Questions about XML sitemap
Does Every Website Need an XML Sitemap?
No. Small websites with clear internal links often work well without an XML sitemap because search engines can easily find their pages.
But here’s the thing: larger websites, sites with many levels of pages, or sites that publish new content often should use an XML sitemap. It helps search engines find and crawl their pages faster.
Will Submitting a Sitemap Get My Pages Indexed Faster?
Maybe. The truth is that a sitemap can help Google find your pages faster, but then finding a page is not the same as indexing it.
The bottom line is that Google still checks each page before deciding whether to add it to its search results.
How Often Should You Update Your Sitemap?
You should update your sitemap every time your website changes. For instance, if you add, remove, or update a page, you should update your sitemap too.
The good news is that a dynamic sitemap updates itself automatically. It adds new pages and removes deleted pages for you, so you don’t have to edit the sitemap every time your website changes.
Can a Sitemap Hurt Your SEO?
Not by itself. But if your sitemap contains broken links, deleted pages, or pages you don’t want search engines to crawl, it can confuse search engines and waste their time.
That’s why you should keep your sitemap clean and up to date. A well-maintained sitemap helps your SEO.
Where Should You Put Your Sitemap File?
You can place your sitemap in the main folder of your website, such as yoursite.com/sitemap.xml. And then add its location to your robots.txt file. This helps search engines find your sitemap automatically.
Your Action Checklist starting today
☐ Confirm whether a sitemap already exists at yoursite.com/sitemap.xml
☐ If missing, set up dynamic generation using Path A, B, or C above
☐ Remove any redirected, blocked, or noindexed URLs from the file
☐ Split into multiple sitemaps if you’re near 50,000 URLs
☐ Submit the sitemap in Google Search Console
☐ Add the sitemap location to robots.txt
☐ Run the 5-Minute Health Check and fix anything that fails
